


Marble Rivals: How to Win in Marble Blast's Multiplayer
Or at the very least, play a bit better

Table of Contents
Introduction
Welcome to my Marble Blast multiplayer guide! If you’re interested in learning or improving your gem hunt skills, you’ve come to the right place. If you’re here because you read my blog, thank you! But also, you may not get as much out of this as some of my other more general posts. This still has a lot of interesting stuff going on, but you’ll need to have at least some curiosity about the nuances of this particular game. If you’re in for the ride, let me take you on a journey through one of the most exciting head to head games I’ve had the pleasure of mastering.
If you’re new to multiplayer, the game at its core is quite simple: score more points than your opponent. Across different levels, sets of gems spawn in groups, with red gems (“reds”) being worth 1 point, yellows 2, and rare blues 5. Once the time limit’s up, whoever has more points wins. Of course, there is much more detail that makes the game exciting, such as powerups to aid your navigation, aggressive tools to disrupt your opponent, and more that this guide will break down in detail. I consider this text to be my personal “The Art of War” for the game, and I’ve done my best to incorporate all that I know about how to play better in both individual games and tournament matches here.

This guide makes several assumptions and I also have a few disclaimers. The guide is for the latest version of PlatinumQuest, a Marble Blast mod updated as of April 2025, with competitive mode enabled. While the guide entails a wide array of information that will be generally helpful to your gameplay regardless, I primarily focus on 1v1s, which is the format held in the annual summer gem hunt tournament, the biggest event of the year. In general, multiplayer in larger groups will index more into camping and trickshots to steal the high value gems away, and less on proper routing and strategy, which are big features of this guide.
Speaking of the major tournament, I’ve still never actually played in one. I started seriously playing competitive gem hunt about five months ago, so there hasn’t been one for me to enter yet. That said, I regularly play against some of the top players in the world, and have even gotten a few to give input on this guide to make sure I’m leading players on the right track. I also hosted a winter tournament of my own and did quite respectfully for a rookie, beating some very competitive players and taking a game off both the 2nd and 3rd place finishers. I am by no means a top player in the community, but I’ve grasped the fundamentals well enough to help players looking to take the next step in their competitive marbling career. The guide is broken down into chapters, each a pillar in a skillset that the best players possess, and I will break down all of them to the best of my ability. Without further ado, let’s dive in.
Chapter 1: Pace
The most obvious and perhaps most important element of a player’s skill comes in the form of their speed: how quickly they can get from point A to point B. That in itself is fairly easy to understand, but the speed and where it applies will actively shift like a pendulum throughout the match, alternating between two different kinds of quickness.
Transitions
A marble’s transitions in a match are the physical embodiment of point A to B, but the points are clearly defined as migrating from the current gem spawn area to the next as efficiently as possible. There are elements of both mechanics and map specific knowledge to this. There are many different mechanics in speedrunning Marble Blast, nearly all of which can be applicable in multiplayer, though some more niche than others. When running individual levels (ILs), a player rehearses one specific path and typically only hones the necessary skills to complete it. Multiplayer maps are far more open-ended and rely on improvisation—how quickly you can think and adapt on the fly. A similar mastery curve applies—the more you practice a map, generally the less adaptation you’ll need when navigating, but still substantially more than solo.
Multiplayer also brings the added uncertainty of the other player(s). When you are running levels alone, you can be fairly confident the marble will roll where you expect if you have enough experience. But when you get blasted off your location or mega’d into the next zip code, you’ll need quick reflexes and on-the-fly thinking to recover in the most optimal way. Using a super speed backwards to stay on the map after being thrown in the wrong direction isn’t any good if you’ve taken so long to think or turn around that you’re already out of bounds. In the same vein, one skill I never bothered to master alone that I’ve found important is natural bounces (NBs), where if you let go of all movement keys your marble will bounce off of a surface with standard physics. If you’re pressing buttons, even if trying to slow down, the game has a tendency to make you slide along walls or ground with significantly less resistance then you would have by bouncing. Considering multiplayer frequently involves getting to a location as quickly as you can and then stopping as quickly as possible to collect gems, using NBs to prevent yourself sliding off a platform is pretty handy and often the difference maker in saving a precious point or two.
Of course, like the rest of the game, raw mechanical pace involves your standard marble toolkit. Diagonal movement (turning the camera 45 degrees, pressing two movement keys and moving 41% faster since they didn’t normalize movement vectors in 2003) should be second nature to you, though be willing to drop it in the most precarious of situations to ensure you can keep your eye on the gems, opponent, and ground around you. Better to be slow than dead and respawning somewhere undesirable. Edge and wall-hits are also important, but with use cases tending to be a bit more map specific. Finally, you’ll want to be a master of utilizing blast and several powerups to navigate: most commonly super speeds, gyrocopters, and super jumps (the last of which are pretty easy).

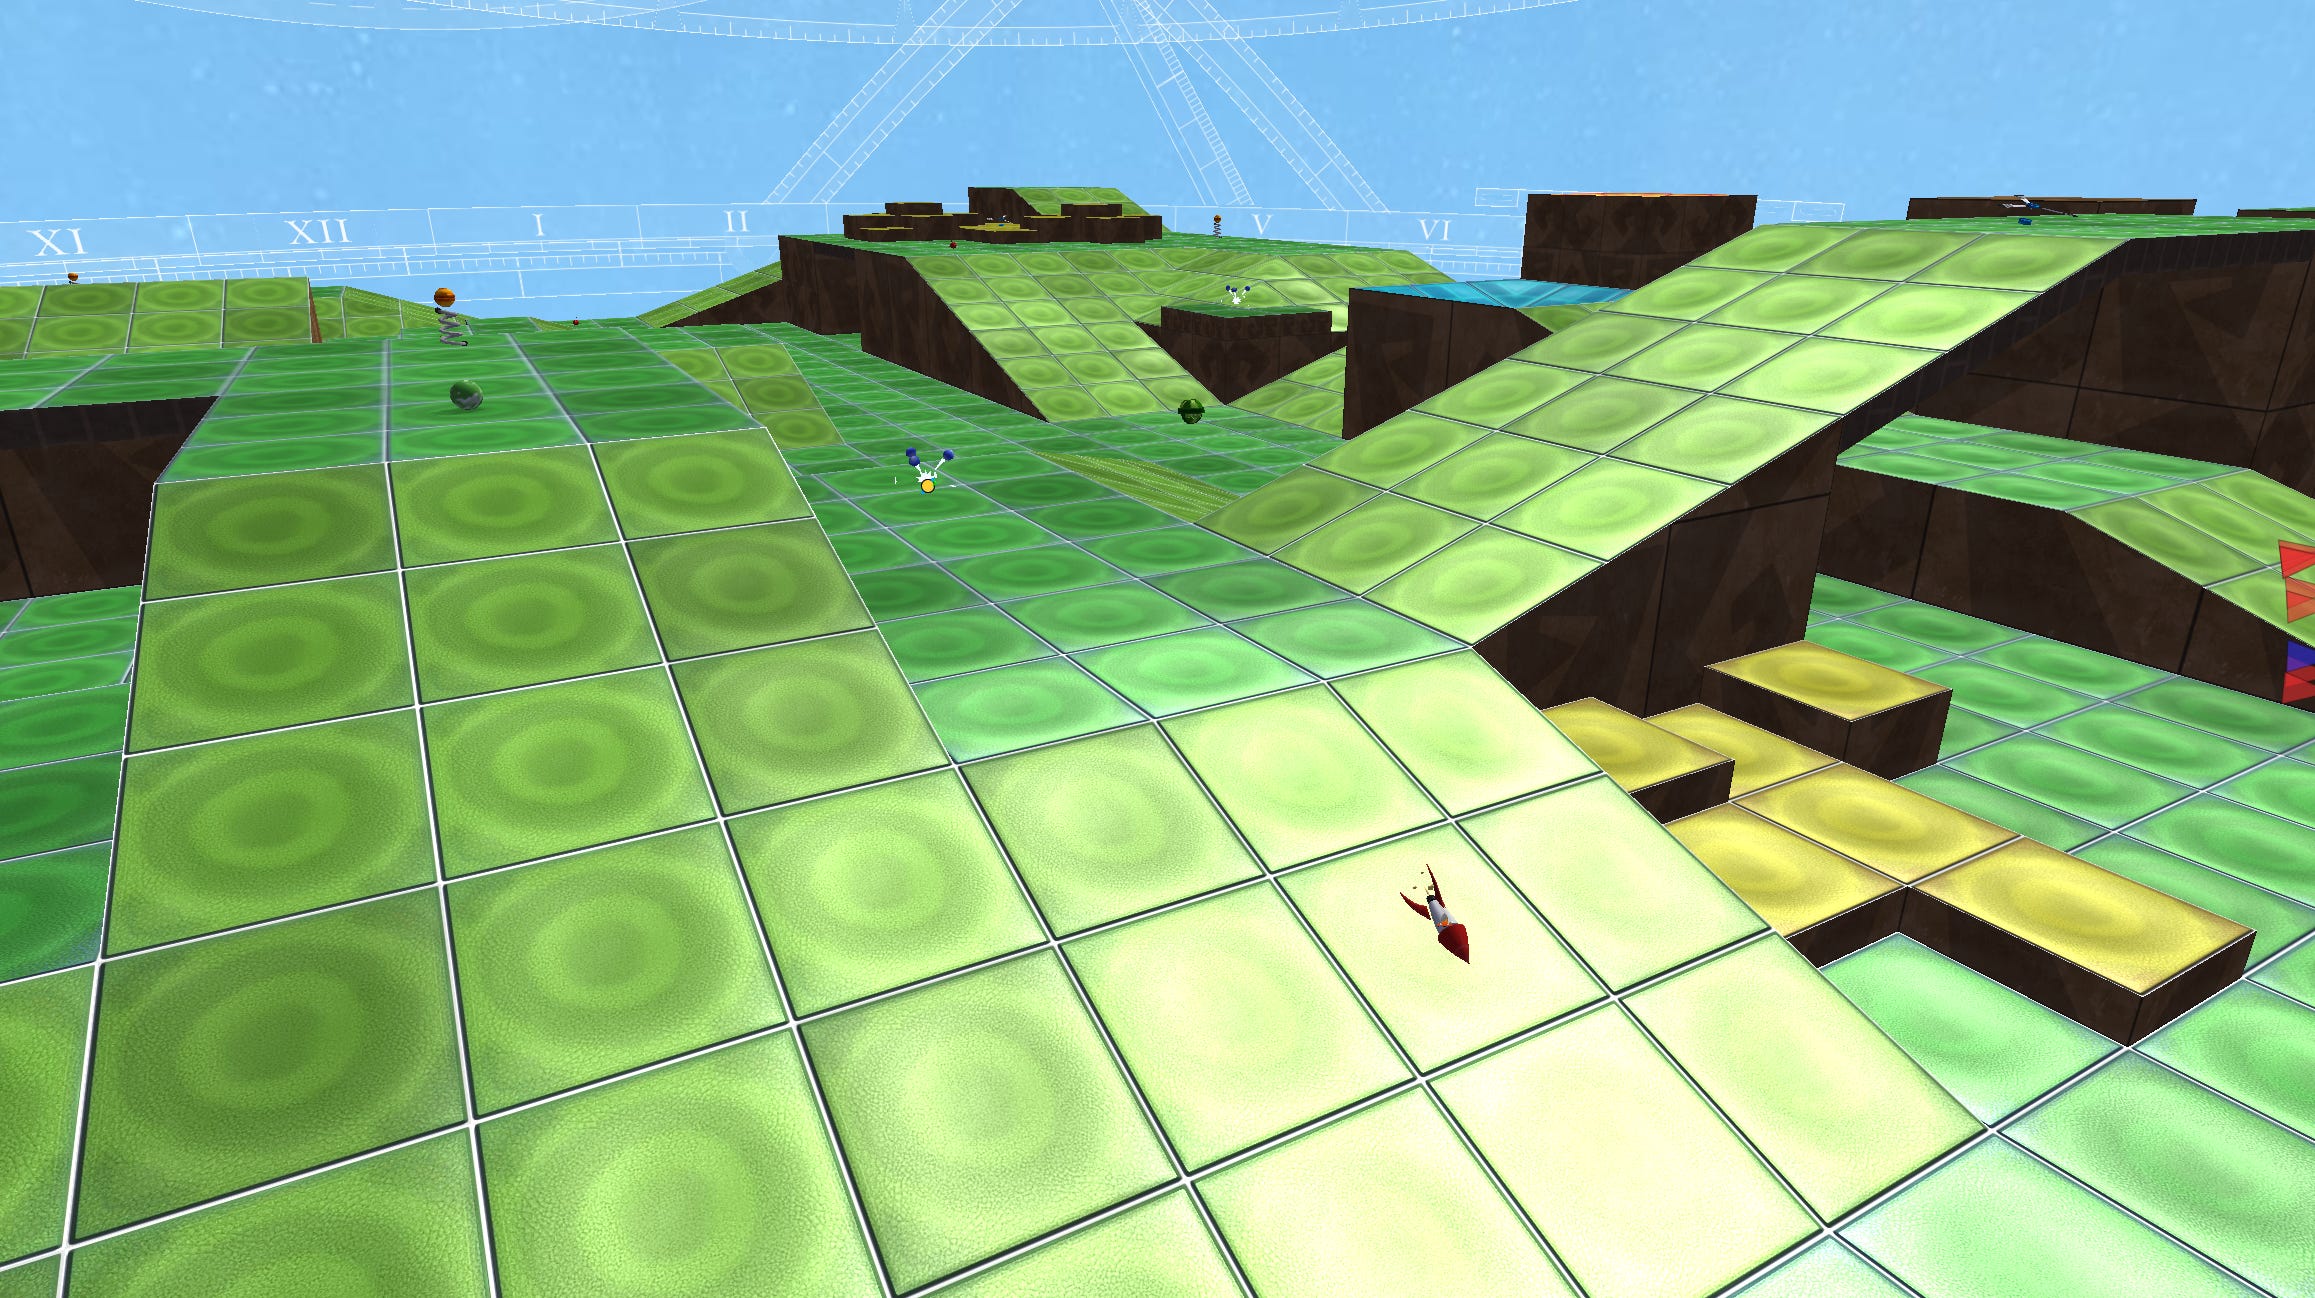
On the map side, in an open map like Bowl it is often a straight line through some hills to the upcoming spawn, measured only by a player’s raw mechanics. But on a windy and branching map such as Triumvirate (pictured below), it’s often substantially more murky. Is one path quicker than the other? How does that change if I’m already holding a powerup? Do I have enough of a blast bar to make it up to that gyrocopter and fly over? Which path is my opponent likely to take? These are all questions that a good player needs to consider in under a second or risk losing their advantage even if they make the right choice.
In this section I’d like to introduce a term many players of various games are familiar with: expected value (EV). In Marble Blast, we can use EV as a reference point when weighing different outcomes— for example “I think picking up a mega here to knock my opponent off is a higher EV play than holding my super speed”. The game is largely zero-sum, meaning a gem that I don’t get is a gem my opponent will get, so red gems being one point are effectively a two point swing each on the final scoreboard. However, with the ping grace period (players can share gems and power-ups obtained within a brief period of time), plus the introduction of competitive mode and the spawn timer that isn’t necessarily always the case.

It should be clear by this point that there are a vast amount of possibilities and considerations when pathing around a level, and with most maps having anywhere from 10 to 20 distinct spawn locations you are frequently going to be presented with a spawn to spawn combination you haven’t encountered with the same tools you have before. This is also why this section is largely explaining how things work and not offering tips or advice—you are going to see many more situations than anyone could ever prepare you for. That said, there’s always learnings to be gleaned from practicing individual maps, especially with specific tricks that may prove useful every few games.

One other thing to consider when traversing across a level is the respawn triggers that the marble is teleported to after falling out of bounds. These aren’t just there to revive you—if you understand the positioning of them, they can serve to get you out of unfortunate situations. Sacred is a great example of a map that has a lot of its mastery involving respawn abuse to navigate the precarious pathways. With few available powerups, using blast to fall in an area closer to your objective can result in a much faster transition. It’s also worth nothing that no marble can respawn in the same place twice consecutively—including both you and your opponent. You can utilize this information in some niche scenarios, such as the bottom level of Triple Decker, where falling out of bounds twice will put you up a level to the next closest spawn, much faster than going up and around the ramp.
Routing
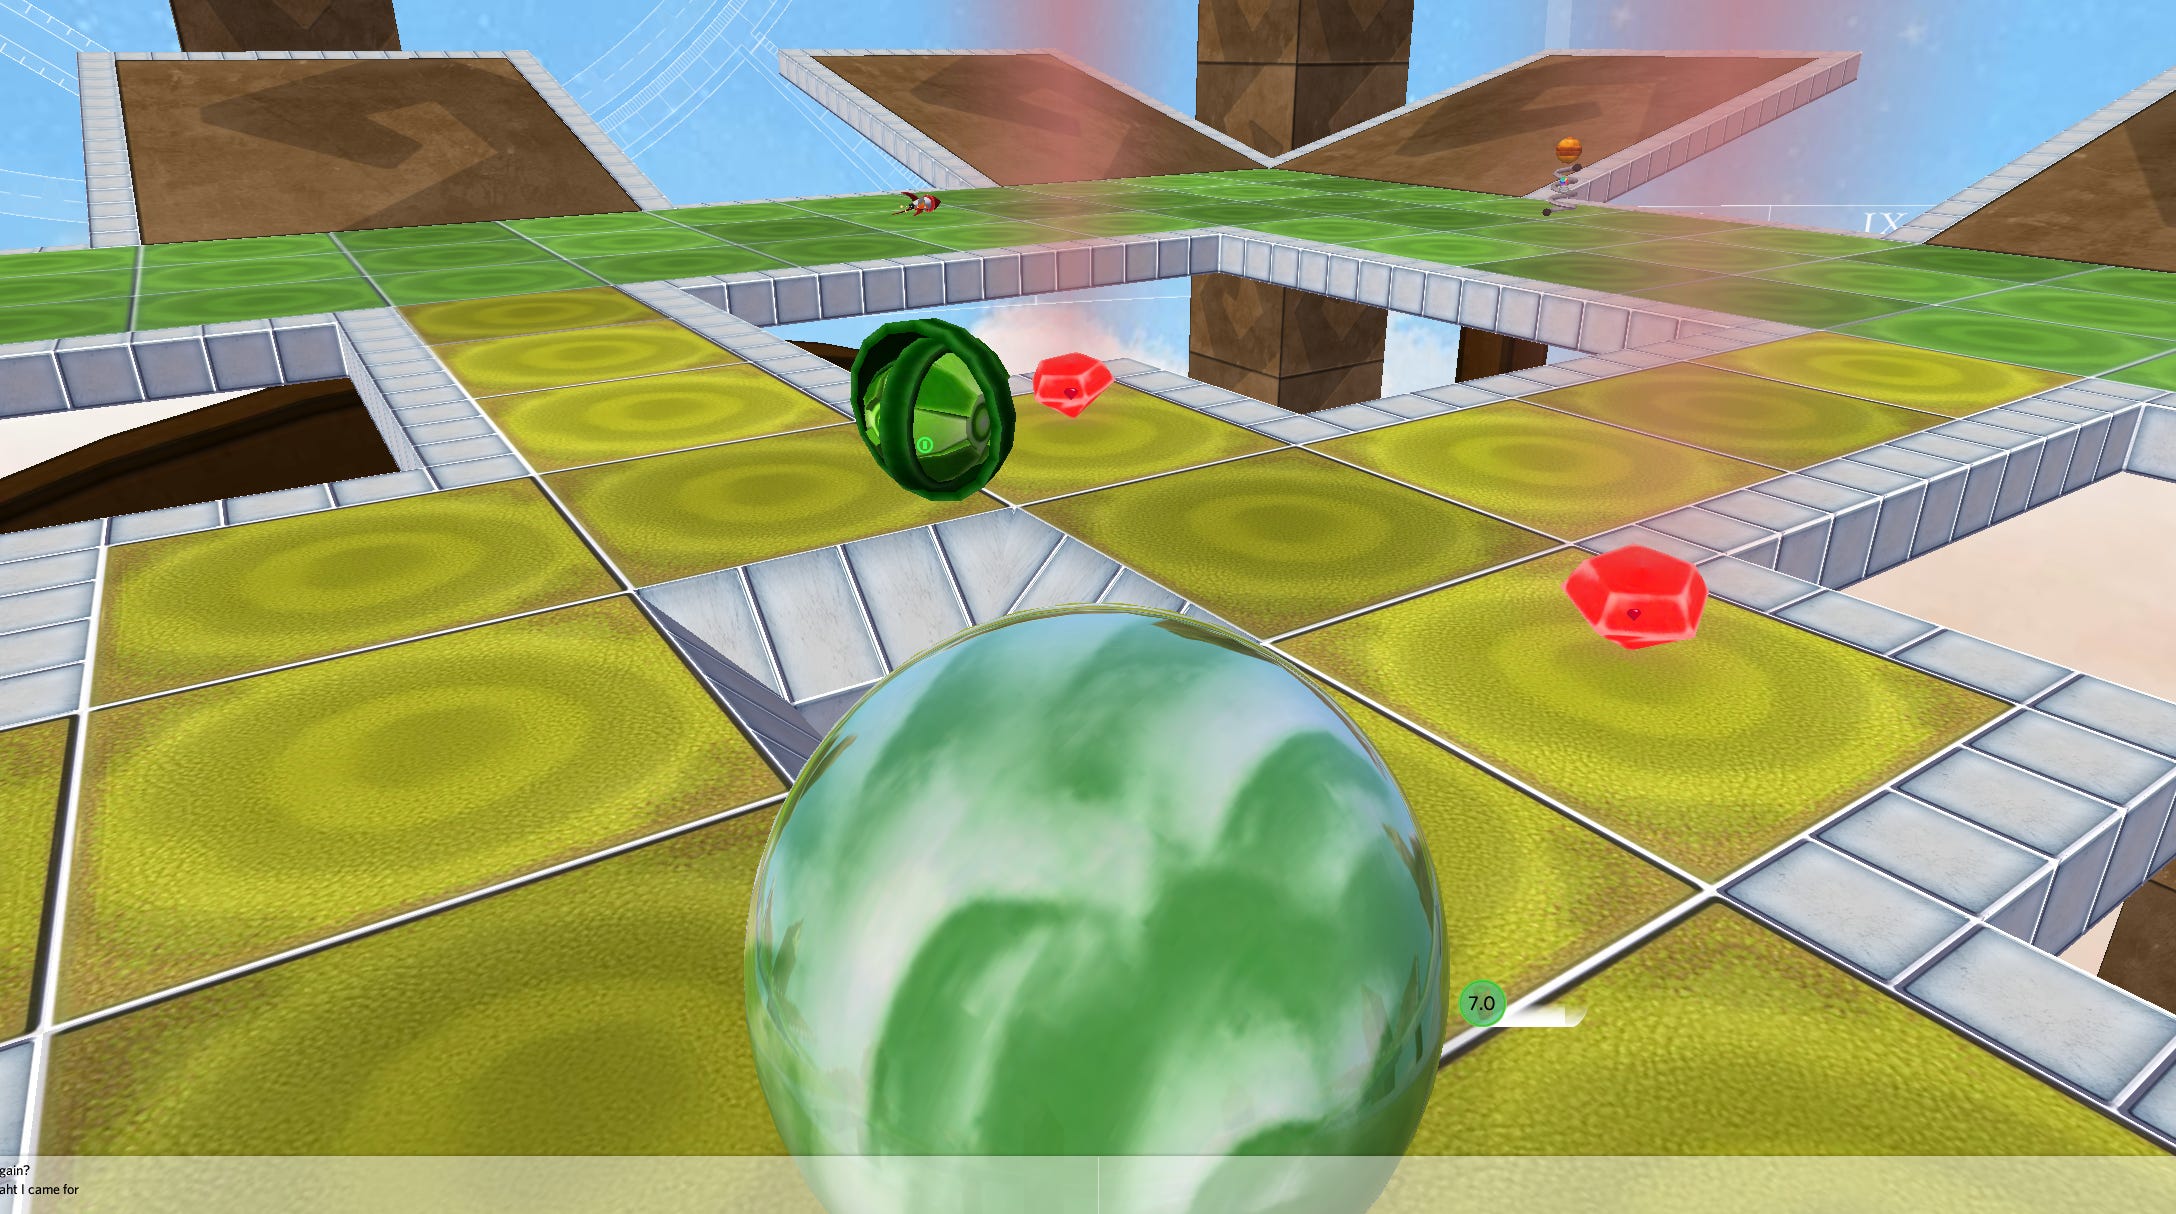
Let us now assume that the marble has made it to its destination—the next spawn cluster of gems. Now comes the second part of the pace equation: efficient routing within a spawn. You’re always in a race against time with your opponent, with the goal loosely being to walk (roll) away with more points each spawn. In solo play, it’s mandatory to get each gem before another set will spawn, so you have to calculate a full route through each in some sort of cursed traveling salesman problem every few seconds. That ends up looking something like the orange arrow path highlighted below- whereas for multiplayer, it’s much more important to look for chains of gems that can be obtained in quick succession and are unlikely to be interrupted by your opponent. In the below example, the purple path routes through 5 points (2 yellows, 1 red) out of a total of 9 points in the spawn. This can be done in a few seconds and, crucially, leaves your options open once the last yellow is reached. You can turn around and try to clean up some reds, or you can loop back for the blast and a powerup.

It’s also pivotal to take your opponent’s position into account. Let’s imagine with the same example above that the other player is slightly ahead to the pounce, and is currently on the far right side of the ice sheet near the super speed. Suddenly, the purple path is not nearly the deal it was before, as the final yellow and red are likely to be some of the first targets for your opponent who will reach them before you. Instead, it’s a reasonable idea to cut your losses and secure the gems closer to you, taking the nearest yellow and pathing left to the chain of three reds. This leaves you in a worse final position, but still collecting a sizable chunk (4 or 5 / 9) of the spawn, which is not bad when you’re running behind to the play. Conversely, if we know our opponent is lagging severely behind having gotten stuck on a wall or fallen out of bounds, it’s evident we have some extra time and can play significantly more greedy, scooping up as much of the spawn as we can with a similar route to the orange line.
Chapter 2: Strategy
EV and Spawn Preparation
The gem routing example is all well and good, but largely self contained within each set of gems. For the sake of argument we’ll call the time taken to clear the full spawn (orange line) 10 seconds, and the time taken to clear the optimal chain (purple line) 4 seconds. If we have merely half a second lead on an opponent directly behind, assuming no mistakes we can clear the 5 point chain and leave a fractured set of gems for them to chase. While they’re taking the extra time to do that, we have a few precious seconds to prepare for the next spawn, leaving the remaining gems to our opponent. If we have no powerup currently and picking up a super speed will give us a 3 second advantage over our opponent to the next spawn, we have managed to come out ahead on the current spawn and extend our tempo and momentum in the match from half a second to three seconds. With the next spawn that could result in an increased gem share, or snowball into an even larger tempo advantage. Marble Blast is a very momentum based game, with matches frequently following the formula of 3-4 spawns dominated by one player, followed by a mistake, interaction or sheer luck that flips the pacing, where the other player manages to claw back into the lead one spawn at a time. Close matches where players split every spawn near 50/50 are rare to come by, even if games ending close in score are quite common.
Reflecting back on our EV definition, we can weigh the options available to us as a player once we clear the purple chain of gems. We could go back and fight our opponent for the remaining four red gems. Let’s say that results in us claiming half of them (EV of 2 points), but our tempo advantage resets and it’s a dead heat to the next spawn. This is the simple calculation. On the other hand, if we grab the super speed and blast, we have the potential to extend our tempo, with that potential being converted to actual results when the next spawn actually comes into play when the last gem is claimed. There are a large number of possibilities for what could happen next, but they can be summarized in a few buckets of similar outcomes. Let’s estimate that there are about 10 different-ish sets of spawns on Playground.

If the next spawn is where the current one already was, the advantage is firmly with our opponent—we’ve moved and they are still next to all of the precious gems. We may be able to recoup some losses here using our blast and super speed, but they’ll typically claim a majority of the spawn if they aren’t caught by surprise. This is Bucket A, and our decision to leave and prepare comes back to bite us, resulting in an EV of -3 (we lose 3 points on the spawn to them on average). This outcome happens for only one spawn, out of the ten we estimated. Another possibility is that the next spawn is between the two of us. In this case, we have prepared and have a powerup advantage, also maintaining the ability to blast them off if the opportunity presents itself. This Bucket B results in an EV of 2, and happens when the spawn is in the middle part of the map, or about four spawns out of ten.

Finally we can look at Bucket C, the situation where the spawn is further away from the current one. In this case, we have the super speed to quickly accelerate and gain a two to three second lead over our opponent, and we still have the blast to spare once we’re there. Altogether, this results in us almost always winning the spawn, with an EV of 4. Given we were on one half of the map, the odds of a further spawn on the other half are about five in ten. This roughly covers all the situations, and now we have enough information to estimate the EV of this play—remember, skipping out on some gems to better prepare for the next spawn.
The calculation looks like this, with the decimals corresponding to the percentages of the spawn likelihood, and each bracket referring to one bucket A, B and C:
(-3 * .1) + (2 * .4) + (4 * .5) = 3
While there are situations where this play comes back to bite us, we have effectively traded points now in exchange for potential points later. This play has an EV of 3, greater than the EV of 2 for trying to fight out for the scraps of the original spawn. Without any hindsight, it’s the better play! But it’s also higher risk—this brings me to an essential point. Marble Blast multiplayer is inherently a risk management game. Much like investments in real life, points now are guaranteed compared to points later, and you do have to have odds in your favor as well as continue to execute properly in order to actualize your potential points into a real score tally. But the numbers make sense, and they’re not even including the likelihood of you continuing the tempo advantage into subsequent spawns, snowballing your lead further. This will sometimes result in lost games when luck doesn’t go your way, but tournament games are best of series for a reason—the luck will balance out over time.
Obviously, I am not a superhuman calculator running EV odds in my head every time I path through a gem. Through playing the maps you develop a heuristic for what that EV looks like for various spawns around the map, or the time advantage that a powerup might save you. We can even assess the EV of deciding between picking up a super jump or gyrocopter on Epicenter or Spires, analyzing what percentage of gem spawns are better suited for one or the other around the map. But this gets out of hand quickly, and it’s clear that in the heat of the moment in battle, it all comes down to vibes.
Let’s briefly touch on being on the receiving end of such a strategy. The most common mistake I see even experienced players make, but especially quick speedrunners branching out to multiplayer, is picking up the last red gem when your opponent is better prepared than you. In this instance your EV of picking up the gem is 1 (the value of the final red), but the potential EV of the next spawn when you know your opponent is better prepared is almost guaranteed to be negative. You will be transferring all remaining momentum to your opponent if you are not adequately prepared with a powerup at minimum, often resulting in a swing of 4-6 points against you or even having to sack an entire spawn. What do I mean by sacking a spawn? If your opponent is significantly ahead to a spawn (3-5 seconds) and by the time you get there there will only be 1-3 points left for you, it is probably better to consolidate your position by preparing for the next spawn instead of reinforcing their momentum by using your resources to chase them. It’s a tough reality to face in the moment, but swallowing your pride can often minimize losses and keep you in with a better chance to win the game.

Risk Management
It’s worth mentioning that there are times where you want to index into risk, and times where you want to avoid it at all costs. If you’re up by 20 points with 30 seconds to go, you want to minimize risk everywhere possible. This means staying near your opponent, so that any spawn that is lucky for them is also lucky for you and vice versa. Without a major blunder, they’ll only be able to pick up 2 or 3 points per spawn over you and run out of time before any comeback can be realized. Better yet, if there’s a tricky spawn where the gems are in precarious locations or spread out, you can leave them all to your opponent to run down the clock while they struggle. One strategy you may also employ when time runs low is camping. I like to pretend I’m going for an uncontested red near the end of a spawn and then not actually take it until I have to. Oftentimes the opponent will assume it will be gone and runs off to prepare for the next spawn, but in reality you can stall 5-10 seconds each time you do this.
Conversely, if you’re down those 20 points, it becomes your obligation to take on as much risk as possible for potential reward. While you’ll often have to collect every last gem, if provided the opportunity you should distance yourself from your opponent as much as possible, gambling big on a lucky spawn and snowballing into a tempo advantage for the last spawn or two. Essentially, throwing a Hail Mary. However, if you’re already mounting a bit of a comeback and momentum is on your side, it may be best to ride that tempo and continue disrupting your opponent as much as possible. The best players will track the score and the clock to influence the amount of risk they take on near the end of the game, and it can even be extended to the matchup outside the game—if you believe you’re a heavy underdog against a tournament champion, may as well roll the dice throughout the game and try and hit big, and if you’re the favorite expected to win, opt to secure the red in the hand instead of the yellow in the bush.
Defaults
To cap off this chapter, it’s important to take a look at what good preparedness looks like. If you want to be fully loaded between spawns, this is my basic checklist:
Powerup likely to be useful (not the super bounce on Apex)
Blast, if present in the map
Positioning central to important likely spawns
If you have all of these things, it’s typically in your hands how well the next spawn is going to go. But these things are not easy to get online in a few seconds between spawns. Good luck fighting over a powerup on Lupus or a blast on Vibrancy Grounds. Wouldn’t it be easier if there was a reliable way to fall back on and prepare yourself in a few seconds? Lucky for you, there’s just the thing—executing on a default. A default strategy is a location on a map you can reset to in order to gear up for the next spawn, providing utility and positioning to give you a tempo advantage in a match. Any given map may have multiple defaults of varying usefulness and purpose, but we’ll look at a few examples here and explain why they’re so useful as a tool.
A player regularly utilizing defaults in a game and planning ahead for them each spawn carves a sizable advantage over the course of a game, even if that advantage is built in small increments one spawn at a time. Rushing to these defaults and cutting out the last one or two gems from the spawn can be quite crucial, given that if you claim the powerup and blast it is also denying them to your opponent, who will be forced to scavenge elsewhere and have their momentum and gameplan thrown off. Adding this effort to your opponent’s mental stack while you are collected and ready for the next spawn will leave them scampering for whatever suboptimal powerup they can find when the spawn timer reaches zero.

Defaults are a very important part of practicing a map and adding it to your competitive pool. While many maps have one excellent default (taking the only powerup and blast on Vibrancy Grounds comes to mind), with the size of most maps there will inevitably be times where either the game is close enough you aren’t afforded time, or your position is just too far away to prepare within five seconds. In these cases, it’s beneficial to have some backup defaults in your playbook—areas in each part of the map that may not be optimal, but still supply you with some resources and deny your opponent.
On some maps, the positional center is not quite the framing needed for a great default. On a map like Epicenter or Concentric, it’s abundantly clear that the center is the wisest place to be—you’re equidistant from each outer spawn and immediately next the largest point spawn in the game, maximizing your average EV. But on others, the calculation is more like a center of mass, considering the weight of each spawn around you. On Horizon, the infamous double blue spawn in one corner of the map is worth 14 points or more, and both blues are often collectable by the same person if positioned optimally. This contrasts against the opposite corner of the map, which features no blues and an average points per spawn (PPS) of 6 or 7. Therefore, with a massive highly variable spawn in one corner, the default on Horizon should consider that as a looming possibility, and always be prepared for it as much as possible as many matches have been won and lost through such a timely spawn for one party. Similarly, all the blue spawns on Gems Ahoy! are in the lower section, meaning you’d rather cheat towards that end of the map if given the option. If you guess wrong, you’ll be on the hook for far less points than if you gambled the other way and were slow to a blue.
Combining defaults with routing, it then follows that one of the best paths to mastery of an individual map comes from rehearsing how to get to each spawn most efficiently from one or two default locations. How do you snipe any yellow or blue on Horizon from the central raised lane with any given amount of blast? These are techniques you don’t often get practice with in solo hunt (since you are rarely in a default position, having to always pick up the most inconvenient gem in any given spawn), and so setting aside time to tackle it can leave you feeling much more comfortable in matches and make your opponent feel like you’re always one step ahead of them.
Chapter 3: Aggression
Up until this point we’ve largely focused on laying out our own game plan: be fast, consider the positioning of both yourself and your opponent, and plan ahead for each spawn where possible. But there is a lot more to multiplayer interaction than chasing each other around fighting over gems. You can enable collision when at least one player has a mega marble, you can blast other opponents out of the way, and you can interface with the environment by stealing powerups or triggering nukes. Let’s take a look at each of these.
Mega Marbles
Megas are deadly in the right hands but feeble in the wrong. I still have a lot to learn when it comes to utilizing the most double edged swords of all powerups. For 5 seconds, your marble becomes bigger and can collide with the enemy. Roll into them, and they will be knocked back anywhere from a few millimeters in the air or all the way to infinity and beyond, all dependent on ping, positioning, and which side of the bed the server woke up on that day. In many cases, the knockback can buy you a few seconds of time to collect gems in the immediate vicinity, carving out a tempo advantage, and then your opponent bounces off a wall or falls out of bounds and respawns somewhere nearby, rebounding into action. On some maps that are big enough, however, if the player is knocked tactfully from one corner of the map into the rest of the map, they could be taken out of the game for even 10 seconds or more.
Using megas is not without risk. The transition period to and from becoming mega is incredibly janky, with your marble sometimes sharply losing or gaining momentum, or being stuck in the ground. When speaking to Jean, a master of the mega known for his aggressive playstyle, he characterized mega usage as a game of high risk for high reward. In many ways, this is another form of our EV analysis—opting to try and mega your opponent has multiple opportunities for failure (falling off, hitting a wall, missing a swing at your enemy) that lose you some minor ground, and also numerous positive scenarios with a hefty EV where you claim the payoff of taking your opponent out of commission.
It’s worth noting if two players both opt into mega form, the player that receives the knockback is the one that has less current velocity. So if you’re in an active deathmatch or know your opponent has a mega handy, you’ll want to strike first to avoid giving them the upper hand, gaining speed before ramming into them. If you know you have the mega advantage, it can be better to calmly position yourself in between them and as many gems as possible, rolling over and collecting them to deny as much you can.

One advanced matter with megas is the non-combat tool they provide—that janky momentum that can be added to your marble can be used to “mega-launch” yourself wide distances. The effect is further pronounced on high-friction surfaces, so on a map like Promontory where everything is practically painted in friction and megas are plentiful, you can utilize the powerup for both offensive tactics and furthering your own traversals.
Ultra Blasts
Next, let’s talk about ultra blasts (referred to just blasts from now on), an extremely versatile tool that both fills your meter to allow you the highest jumps, and knocks your opponent away from your current location with considerable velocity. Blasts are extremely important to master because when used properly, they can seriously derail your opponent, sending them out of bounds or off a cliff when they really needed to contest a spawn. Blasts are unique in that they are a powerup not occupying your powerup slot—it’s an additional effect you can use in combination with other powerups. Many trickshots involve using super speed in conjunction with a timely blast, which involves calculated precision when considering how full the blast meter currently is. It can also be used for absurd height and distance with super jumps and gyrocopters.
When should you use blasts? It tends to be best to use it when it feels right, but that’s not much of a helpful answer to someone learning. As you play matches, you’ll get a feel for how it’s best used on different maps as well as the timing of it. On smaller maps like Hunting Around, at a high level the match revolves around camping these blast powerups off cooldown and using them to deny your opponent gems when they make a move. Sometimes, you have to use your blast to make sure you survive the trip from one spawn to the next, and that’s okay. In your mind, you should be weighing the consequence and opportunity cost of when you could use blast, maximizing your EV of usage. If you use it to transition to a spawn faster, it might be 2 EV for a few extra gems, but if you use it to blast your opponent off a platform where the spawn is, it could be worth 5 or more EV. You are also likely to pick up another blast later in the match (depending greatly on the map), so in most scenarios it makes sense to use the blast within a short period after picking it up.

There’s a few notable interactions with blast that you can consider when deciding how to use it. One is to throw your opponent off guard, either by blasting them right when the spawn timer reaches zero (if they happen to be precariously near a ledge or cliff), or when they’re lining themselves up for a super speed or blast of their own to reach their destination. Another great time to use blast is if your opponent is actively using a gyrocopter, in which case the resulting impact will send them flying far further than a standard blast would and completely disorienting them. One thing to consider when you possess a blast and are about to roll over another blast powerup (which you should still do to deny your opponent regularly), you may as well take the opportunity to use your current blast if your opponent is nearby. You’ll likely prevent them from picking it up and may even cause them to lose some gems. The same logic applies to having a mega marble and are about to pick up another powerup—if the situation is reasonable to use the mega, you have little to lose by activating it just before picking up the next powerup. Just be careful about your new bulkier physics when using whatever you pick up next.
Powerup Tracking
The last element I’ll touch on with aggression is the art of powerup denial. By running over a key powerup that both of you need first, you’re furthering your own preparation while denying them and forcing them to go fishing for whatever else is lying around. There are some maps that really reward this, such as claiming the only mega and blast in the Vibrancy Grounds default. On other maps with too many powerups for their own good, it’s less of a pressing matter. I’ve seen some players even use super speeds to get to another super speed pickup just to deny the other player the chance when waiting for the next spawn.
For these reasons, it’s paramount to track your opponent’s position, powerup status and blast status at all times. The best players can make assumptions on what their opponent has based on map knowledge of where that player has been collecting gems and prepare accordingly. By knowing ahead what tools they have available to them, you are able to better formulate a counter attack or at least be aware of what gems you’re going to have to sack when they have a gyrocopter over you on Epicenter. If you’re ready for the next spawn (blast and powerup status check) and your opponent is still scampering to set up theirs, it may be a good idea to pick up the last gem in the current spawn to immediately trigger the next one, giving yourself an advantage with your toolkit before they can respond.
Chapter 4: Map Pool
By now, we’ve covered some important considerations for emerging victorious in individual games of Marble Blast multiplayer. But the best players know that with the amount of luck and randomness thrown around in a short few minutes, one victory can easily be the result of a fluke. The closer two players are in skill, the more likely luck plays a role in being the ultimate decider. A match won by 1-2 points leaves you contemplating if one small mistake was the difference maker, or the 20ms of ping advantage your opponent had. In reality, any decision usually propagates a butterfly effect of positioning and outcomes, so it’s reductive to look at the final score in a results-based analysis sort of way. One game is but a reference point in a database full of matches, and as we accumulate those results together we can begin to see trends and takeaways. It is for this reason that competitive matches are not one game at a time, but tend to be a minimum of best of 5 (bo5) games or more, meaning the player who wins 3+ games first is the overall victor. In tournament play, players alternate map pick, and if the scores are tied going into the final game, a randomizer is utilized to get a fair map for both players.

So when it comes to preparation for a match, any given player wants to optimize their map picks to give them the best chance of victory in an overall match. But what strategies should be employed to reach this end? There are two conflicting goals here—for your picks, you want them to be as practiced as possible to give yourself the best advantage over your opponent. However, you cannot win a tournament match by claiming victory on all your map picks—you can only secure a tie, leaving your fate up to the randomizer, generally favoring whoever is most well rounded across the entire competitive pool. And if you only practice your individual map picks, you are also very unlikely to claim an upset on your opponent’s pick. Given luck is absolutely a factor in individual games, if you believe yourself to be the better player you don’t want to leave yourself facing elimination with one shot on a random map to deliver.
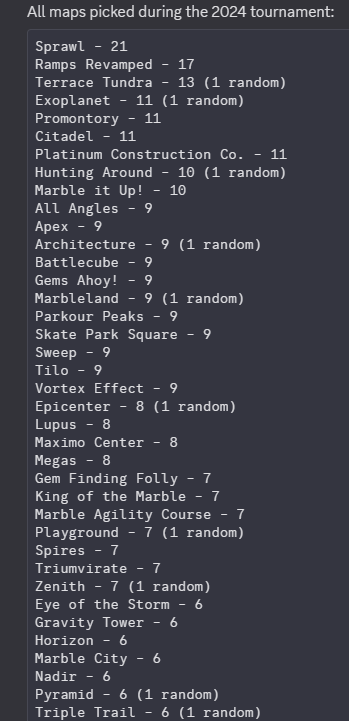
At my day job my company pushes the goal of becoming “T-shaped”. Like the shape of a T, you should have a skillset that covers a wide array of skills (the top bar of the T), while having in depth subject matter expertise in a few areas (the vertical pillar). Funnily enough, this is exactly the sort of model that you want to shape yourself towards as a Marble Blast player—proficient at a surface level on most maps, just enough to threaten snatching a game on them, but also incredibly masterful on a small pool of core maps. Firstly, looking at the wide selection of maps, there is a huge pool of potential picks that it’s near impossible to predict the exact set your opponent will draft against you. But, there are two ways you can prepare. Regardless of your opponent, you can reference the list of most popularly picked maps of previous tournaments (example below) and make sure you are competitive at the top ones. Secondly, if you know your upcoming opponent, you can refine your practice list to maps they are known for or have already picked in the tournament, giving yourself a better chance at stealing a game.
This list may seem a little odd to someone primarily playing casual multiplayer. Sprawl being the most popular map is very predictable—players love it. But Ramps Revamped? Terrace Tundra? Citadel? These are all in the top five and not ones you would see often in your standard friendly multiplayer games. What are Marble City and Horizon doing all the way down at six picks? This phenomenon is largely explained by players optimizing for their own picks. To understand why the list trends this way, we have to break down what makes a good map pick. In my opinion, the best map pick is not the one that you get the highest scores on. It’s not even the one where you win by the largest margin. It’s the pick where you score more points than your specific opponent the highest percentage of the time. There is no functional difference between winning by 1 or winning by 100. Therefore, picking a map that is either feast or famine for you is risky business (unless you’re a significant underdog, which we’ll touch on later). In my experience, the best map picks can be broken down into three components:
High Mastery: the map is difficult to play and has a high skill ceiling.
Low Variability: the map is consistent with its spawns and secure in length.
Low Popularity: the map is uncommon and most players are inexperienced at it.
Let’s start by looking at mastery. A high mastery map rewards players that have significantly more experience. Looking at a map like Blast Club, which is symmetrical, forgiving, small and without a lot going on, there isn’t a lot of room for new strategies or tweaks to prevail. Therefore, the gap between a new player (skill floor) and expert (skill ceiling) is quite small, and the unskilled player has a much better chance of playing competitively versus the expert here. Compare that now to a map like Zenith or Parkour Peaks, which are challenging to navigate and require creative and well executed powerup usage to obtain several of the spawns. I believe this is the biggest and most important factor of the three, and why maps like Ramps Revamped and Citadel are up there in the pick count—when a better player is matched up against a less experienced one, these are great choices to force the underdog out of their comfort zone and suppress any potential challenge. One would expect, then, that Horizon would also be up there, given the amount of trickshots and flawless execution required to snag many of the spawns. Crucially, Horizon is both popular (everyone loves and has played it often, becoming more experienced) and variable (spawns like the double blue mean luck is more likely to be a factor).
A low variability map is one that is relatively consistent with its score output and spawn distribution. On a map like Par Pit, there are no blues to create large swings, and you and your opponent will be in close proximity of each other most of the match. This leaves most of the results up to execution in the moment. The other large predictor of consistency is match length. If you’re playing a three minute map like Battlecube or King of the Marble, if you make even one mistake there is simply no time to claw it back before the match is over. The most consistent maps are the ones that are both lengthy and feature similar spawn values across the map. Marbleland is a good example of this; there are enough scattered blues meaning each is less swingy than they would be otherwise, and being 4:30 in length means there’s ample time for luck to balance out over the course of the game. Another thing to consider is that when playing against an opponent overseas, it’s common practice for the server location to favor whoever is not picking the current map in order to balance out advantages. This means when picking a map, you’ll often have worse ping than your adversary, and you’ll want to account for that by picking larger maps with longer traversal times to make the ping difference a smaller percentage of overall timing from gem to gem, allowing your skill to pick up the remainder.
Finally we come to the most straightforward feature: popularity. It’s a bit self explanatory, but the more popular a map is, the better on average your opponents will be at it. This is why Exoplanet is actually deceptively high up in the pick list, despite being disliked enough that it was actually removed from the competitive pool after the tournament. Very few people have actually put a substantial game count, so the players who are can utilize it as a pocket pick to throw off their opponent. A very similar story holds for gimmicky maps like Eye of the Storm or Battlecube Revisited.

I’ve drafted up a Venn diagram of some maps that exhibit these characteristics, but obviously with more than 50 maps in the pool, not all of them will fit here. That said, it is rare to find a map that fits in all three, and these maps require a high baseline of skill and investment to pull off, but with the corresponding great payoff when mastered. I am by no means a great player at Spires or Prophetic, but I picked and won on both in the 2025 Winter Warm-Up, even taking a game off a semifinalist from the previous tournament. The advantages maps like this offer are great tools to have in your wheelhouse in a long season.
While I highly recommend indexing into picks that follow these characteristics for your overall pool, if you feel that you are significantly outclassed in a given matchup, the calculus changes a bit in the moment. In this case you would want higher variance (as 50/50 increases your odds of winning rather than decreases), and lower mastery (so that it’s easier for you to execute well), while still retaining the lower popularity to throw your experienced opponent off guard as much as you can. You’ll need a lot of luck to convert an entire series with this approach, but an example pick for this strategy might be something like King of the Ring.
The final element of a map pool is the size and scope of your eligible map picks. It’s a significant amount of work to master one map, let alone many. But in tournament play, there is a limit to how many times you can pick a map, and you can’t pick a map multiple times in the same match. In general, you’ll need at least five but up to ten maps you feel confident in picking against the competition. Then for each match, you’ll narrow that down to select the best map against a given opponent. You’ll also need to consider things like saving map picks for future matches. If you expect to be able to beat someone handily even with your 3rd best map, you should probably save your best for the harder opponent coming up next week when you win.
Chapter 5: Improvement
Congratulations on reaching this point in the guide! By now we’ve covered everything inside the game I can advise, and you’re ready to win some matches of your own. This final short chapter focuses a bit more on how you can improve if you’re serious about becoming a better player. Like any skill, it takes a significant amount of hard work and dedication, especially regularly practicing and grinding to work on your map pool, but I’ve found it extremely rewarding when the payoff comes of taking down a worthy opponent. I’ll preface this by saying these are only a few options for improving and the ones that happen to have helped for me, so you should also be willing to experiment with your own methods.
One thing that takes very little time is to start documenting your results in 1v1s. List the opponent, map, date and score for both players. This helps you keep track of what maps you excel at and which you need to invest more practice time into. We as players usually have a decent idea of where we are strong and weak, but having the ability to back it up with data is always useful. You may not want to do this immediately since it takes some upfront time to set up a spreadsheet, but if you decide later you want to start, you’ll wish you did earlier. Once the data is in, you can do handy things like track your average margin of victory/defeat to any given player or on any given map, or both. You can also filter by date and track your progress over time.
Another option you have is to record your matches, and then go back and review them to reinforce any learnings or takeaways from that game. Properly reviewing any practice or competitive match is a skill on its own, but it starts with asking the right question. The game is largely broken up into chunks, one spawn at a time. At the start of each spawn (the moment it appears on the screen and before you move anywhere), consider asking yourself the following questions with the video paused:
What is the fastest way to transition from my current position to the next spawn?
Could I have done anything better during the previous spawn to better prepare myself for this upcoming spawn?
What is my opponent most likely to do from their situation? How much does that effect my game plan?
Then, press the play button and watch to see if and how your execution differs from the plan you envisioned when reviewing. If it’s often substantially different, you may benefit by allowing yourself more time to think in the game before acting. It’s very challenging to meaningfully learn from moments in game, as there is so much happening consecutively that your short term memory is refreshed. Intentionally reviewing your recorded games can remind you of the things you could have done better and you’ll be more likely to remember them in the middle of the game next time.

Briefly I will touch on practicing solo hunt. Without another warm body to spar against, playing for the leaderboard ranks solo is a great substitute for helping a player learn maps. As you improve as a player, you will find it easier to get high scores and compete in the rankings, and on difficult maps it is an efficient method to practice your routing and mechanics. It’s definitely not perfect, and the pace is typically much slower than in multiplayer because no one is going to snipe the blue away from you while you run through having to collect each gem. Just be aware: luck plays a significant role in trying to set top scores, so how well you actually play may not directly correlate with the end result every single time.
It’s finally here—we’ve reached the end of the guide. By following these tips and developing my own perspective of the game, I’ve gone from a low ranked singleplayer nobody to a player capable of taking the odd game off of anyone, all in under six months. In the process, I held a world record on a solo hunt map and hosted an offseason tournament where I placed in the top third. There is much I still have to learn and that’s why I still consult and practice against better players as often as I can, but my point is that anyone is capable of improving significantly with the right amount of patience, dedication and perseverance. It’s a deeply rewarding game to master and emerge victorious in, and I hope these tips and tricks have inspired you to play some matches or incorporate new tactics into your play. Thanks for reading until the end, and best of luck in your games!
Glossary
Camping: A strategy where a player intentionally doesn’t get a gem, forcing their opponents to come back and threaten to take it. Often used to stall out a game.
Chain: A subset of gems that can be efficiently obtained in quick succession.
Default: A consistent set play or location within a given map to fall back on to better prepare for the next gem spawn, oftentimes with a powerup and/or blast.
EV: Expected value, measured in points. Used to assess the quality of certain decisions against each other.
ILs: Individual levels, referenced in a speedrunning context as opposed to full game runs. Marble Blast is primarily an IL focused game.
NB: A natural bounce; a process by when letting go of all movement keys the marble will bounce off of a surface with standard physics.
Ping Advantage: The player with better (usually closer) connection to the server is afforded more time to collect gems/powerups and less lag, aiding them in the match.
PPS: Points per spawn, the score amount of a given gem spawn. Often used to compare between different maps with large or small spawns.
Sacking: Giving up a gem or spawn when it’s clear you won’t make it in time to score much, instead opting to prepare for the next spawn.
Spawn Abuse: Intentionally falling out of bounds in order to respawn at a more beneficial location.
Tempo: A loose term for the advantage in momentum a player has. Can be measured in seconds ahead to a spawn or in the form of a toolkit advantage (powerup, blast, etc).
Trickshot: A maneuver (often rehearsed) utilized to rapidly secure a high value set of gems. Most commonly utilize super speeds and blasts.
Variance: How much luck plays a role in a given match. In a high variance map, the worse player beats the better player more often than a low variance map.
WR: World record, the top score or fastest time on the leaderboards.
Credits to Mazik for reviewing this guide, and to all my friends and marble rivals for driving me to become a better player.